Full Body Tutorial - MS Paint
I’ve edited the full body model to really be compatible with MS Paint. That is what this tutorial will be about. First, go to the TEMPLATES page and get the new full body template. Even if you think yours is current, go get the one that is there now so that we can all be on the same page. Open the template with MS Paint.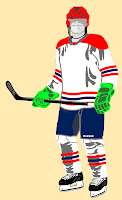
We will start with something simple, re-creating the Chicago Blackhawks' home jersey.
The first thing I would do is get the most current picture I could of the home uniform. Get the complete uniform. Probably the best place to start would be NHLuniforms.com.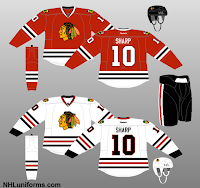 There that will do fine.
I have provided some stripes on the template already, just as a guideline. Those stripes are based on this official image from the Boston Bruins.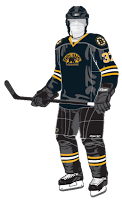
I like to be as accurate as possible so I will use the official Blackhawks colours as provided by ColorWerx. Open this in another MS Paint window.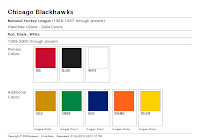 Select a very small square of the red.
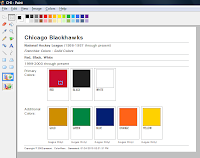 Go to the EDIT tab and select COPY. Then go to the full body model. Go to that EDIT tab and select PASTE.
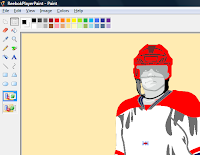 Make sure to place that small square of red in a place where you are going to be colouring red.
Now use the COLOR PICKER and click on that small square of red.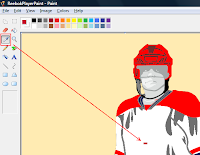 Then use the PAINT CAN tool and fill in the appropriate sections of the jersey and socks, like this...
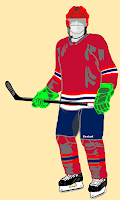
Just like how we grabbed a small square of red from the colours image, we are now going to grab a small square of black. Again, paste it in a section that will be coloured black.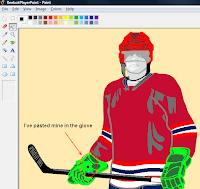 Use the COLOR PICKER to select that black. You'll now want to colour the things that need to be black. This is where you should refer to the NHLuniforms image, to see what is black. Your template should now look like this.
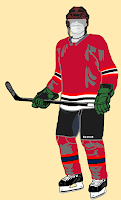 There may be some "loose" pixels in the helmet and around the stick and gloves. Over time I will fix this, but for now I would suggest zooming in and colouring them yourself. You can tell that we are going to have to colour in those red arm stripes (on the jersey) with the Blackhawks' red. Do that now by using the COLOR PICKER on the red of the jersey. Then fill in those red stripes.
On to the socks! The remaining red and blue stripes need to be coloured white. Do that now. Your template should look like this.
The final step, before the shading, is to fill in the collar. As we can see from the NHLuniforms image, the top stripe of the collar is black and the bottom is white. Go fill those in now. Don't forget to use your COLOR PICKER for accurate colours, and fill in those "loose" pixels. Here is where you should be.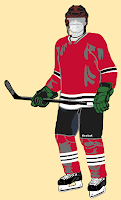
Now it's time to colour in the shading. This is done by using darker shades of the colour where the shading is sitting. For the jersey we will need a darker red. Use the COLOR PICKER to select that red. Now go to the COLORS tab and select EDIT COLORS.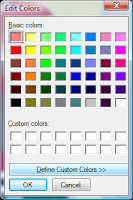 Click the button that says DEFINE CUSTOM COLORS. Bring down the triangle on the very right to use a darker shade of red.
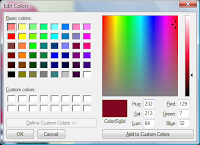 Over time you will become accustomed to how much darker you need these shades. Practice will improve your skills. Hit the OK button. Now use the PAINT CAN tool to fill in the shading that needs to be the darker red. Here's what it should look like.
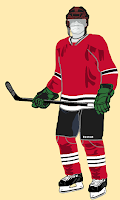
Now the shading has to be done for the black areas on the template. Just as above, go to the COLORS tab and follow the same procedure.
You'll notice on the bottom right of the EDIT COLORS window it says Red, Green, Blue and there is a number beside each. That is a colour's RGB (Red, Green, Blue) value. I strongly suggest getting accustomed to using these numbers so that you don't always have to have the COLOR PICKER on hand. For black shading I like to use RGB 0,0,0. So, fill in the black shading areas on the gloves, pants and helmet. Now this is what we should have.
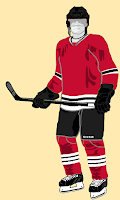
Obviously, things aren't perfect or exact. That will be up to you to carefully add lines and other things as needed. MS Paint has its limitations and when they hold you back it is up to you to take the time to painstakingly use the PENCIL or LINE tools to add things you may need.
Now it's time for the logos. This is where MS Paint is really going to show its limitations. You're going to need to open up a Hawks logo in a new MS Paint window. Make sure the background is the same red as the jersey. Resize the logo to fit on the front of the jersey. I'd love to give you exact numbers here, but it's going to be trial and error at this point. Yes these resizes and rotates will pixelate the image, but at this moment I don't have an MS Paint answer for you. Even I had to finish my final pic in Paint.net.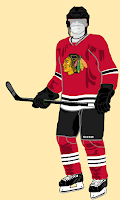
The shoulder patches and numbers will have to be done the same way as you placed the logo on the image.
Hopefully this has helped, even a little bit. I find the best way to learn is to make mistakes, so don't be afraid to screw up!
If you use Paint.net or Photoshop and you don't have the layered full body template, then send me an email asking for it. I can send it in either format.

We will start with something simple, re-creating the Chicago Blackhawks' home jersey.
The first thing I would do is get the most current picture I could of the home uniform. Get the complete uniform. Probably the best place to start would be NHLuniforms.com.
 There that will do fine.
I have provided some stripes on the template already, just as a guideline. Those stripes are based on this official image from the Boston Bruins.

I like to be as accurate as possible so I will use the official Blackhawks colours as provided by ColorWerx. Open this in another MS Paint window.
 Select a very small square of the red.
 Go to the EDIT tab and select COPY. Then go to the full body model. Go to that EDIT tab and select PASTE.
 Make sure to place that small square of red in a place where you are going to be colouring red.
Now use the COLOR PICKER and click on that small square of red.
 Then use the PAINT CAN tool and fill in the appropriate sections of the jersey and socks, like this...
Just like how we grabbed a small square of red from the colours image, we are now going to grab a small square of black. Again, paste it in a section that will be coloured black.
 Use the COLOR PICKER to select that black. You'll now want to colour the things that need to be black. This is where you should refer to the NHLuniforms image, to see what is black. Your template should now look like this.
 There may be some "loose" pixels in the helmet and around the stick and gloves. Over time I will fix this, but for now I would suggest zooming in and colouring them yourself. You can tell that we are going to have to colour in those red arm stripes (on the jersey) with the Blackhawks' red. Do that now by using the COLOR PICKER on the red of the jersey. Then fill in those red stripes.
On to the socks! The remaining red and blue stripes need to be coloured white. Do that now. Your template should look like this.

The final step, before the shading, is to fill in the collar. As we can see from the NHLuniforms image, the top stripe of the collar is black and the bottom is white. Go fill those in now. Don't forget to use your COLOR PICKER for accurate colours, and fill in those "loose" pixels. Here is where you should be.

Now it's time to colour in the shading. This is done by using darker shades of the colour where the shading is sitting. For the jersey we will need a darker red. Use the COLOR PICKER to select that red. Now go to the COLORS tab and select EDIT COLORS.
 Click the button that says DEFINE CUSTOM COLORS. Bring down the triangle on the very right to use a darker shade of red.
 Over time you will become accustomed to how much darker you need these shades. Practice will improve your skills. Hit the OK button. Now use the PAINT CAN tool to fill in the shading that needs to be the darker red. Here's what it should look like.
Now the shading has to be done for the black areas on the template. Just as above, go to the COLORS tab and follow the same procedure.
You'll notice on the bottom right of the EDIT COLORS window it says Red, Green, Blue and there is a number beside each. That is a colour's RGB (Red, Green, Blue) value. I strongly suggest getting accustomed to using these numbers so that you don't always have to have the COLOR PICKER on hand.
 For black shading I like to use RGB 0,0,0. So, fill in the black shading areas on the gloves, pants and helmet. Now this is what we should have.
Obviously, things aren't perfect or exact. That will be up to you to carefully add lines and other things as needed. MS Paint has its limitations and when they hold you back it is up to you to take the time to painstakingly use the PENCIL or LINE tools to add things you may need.
Now it's time for the logos. This is where MS Paint is really going to show its limitations. You're going to need to open up a Hawks logo in a new MS Paint window. Make sure the background is the same red as the jersey. Resize the logo to fit on the front of the jersey. I'd love to give you exact numbers here, but it's going to be trial and error at this point. Yes these resizes and rotates will pixelate the image, but at this moment I don't have an MS Paint answer for you. Even I had to finish my final pic in Paint.net.

The shoulder patches and numbers will have to be done the same way as you placed the logo on the image.
Hopefully this has helped, even a little bit. I find the best way to learn is to make mistakes, so don't be afraid to screw up!
If you use Paint.net or Photoshop and you don't have the layered full body template, then send me an email asking for it. I can send it in either format.
Full Body Tutorial - MS Paint
 Reviewed by Ryan
on
December 03, 2011
Rating:
 Reviewed by Ryan
on
December 03, 2011
Rating:


3 comments:
You already sent me the layered temp., but dont know how to do this, i use paint.net, help would be appreciated, thanks.
Thanks for the help! I will be sending in a concept using a full body model real soon!
Ryan, I'm not sure if you forgot, but you never posted my Dhl concept, I just remembered because it was getting pretty close to the deadline, thanks, -Spirit104
Post a Comment